With this guide, you will learn how to grill chicken breasts on gas grill. You will surely get a soft, juicy, and moist grilled chicken breast with the best sear marks.

And all you need to do is just follow a few simple steps. You will learn the ways and methods you can use a gas grill to easily grill chicken breast.
Grilled Chicken Breast
Grilling chicken breasts on a gas grill to get a perfect grilled chicken breast is one of the most delicious ways to cook and enjoy soft and moist chicken breasts.
However, as said, moist and tender grilled chicken breast is extremely easy, but it is also easy to dry it out, overcook, or not get the right sear marks.
Well, let’s get down to the recipe for grilled chicken breast as it contains the simple steps you will need to take and follow to make a moist grilled chicken breast.
Recipe for Grilled Chicken Breast
How to Grill Chicken Breast On Gas Grill Perfectly
Preparation Time: 1 hour and 10 minutes
Cooking Time: 8 min.
Yield: 6 – 8 servings
Method: Grilled
Cuisine: American
Ingredients
- 4 boneless skinless chicken breasts (about 1 and ½ Ibs.)
- 4 cups of cold water.
- 1 tablespoon of Morton’s kosher salt
- 2 tablespoons of garlic powder.
- 1 tablespoon of dried thyme.
- 2 tablespoons of vegetable or grape seed oil.
Laid-Out Instructions
- Firstly, you need to slice the chicken breast in half width-wise. Then, get a plastic wrap and cover one portion with it.
- This is to stop the chicken juice from getting everywhere in your kitchen when you start to pound it.
- You must pound it until its thickness is uniform. There is also an alternative. You can go for a meat tenderizer with a fat side if you have one.
- But, if you don’t have one, you can use a rolling pin. All you will need to do is to just neat the chicken breast and focus on the thickest part of it, trying to get it to be even with the thinnest area of the chicken breast.
- And, with that being done, you can put the chicken breast aside for a moment. Get a medium-sized bowl and proceed to measure the salt and water into it.
- Then, you are to mix thoroughly till the salt gets dissolved. Afterward, you can add garlic powder and thyme. Then, mix them.
- In the salt mixture, also add the chicken breasts. Ensure that all of the chicken breasts are submerged in the salt mixture.
- When you are sure of this, you can then get a plastic wrap and cover the bowl with it. Proceed to refrigerate it for about 15 minutes to 2 hours.
- After that, you are to get the bowl from the refrigerator, then remove the chicken breast from the bag, and massage it till it gets dry.
- Get rid of the salt mixture. And, allow the chicken breast to rest at room temperature. This should go on for more or less 10 to 15 minutes while you prepare and warm up the grill.
- You are to oil the grill grates. Then, when the grill has cooled off, get a paper towel, and dip it into an oil that has a high smoking point.
- Afterward, you are to get tongs and use them to rub the oiled paper towel onto the grates. With that being said, warm up your grill for direct cooking over medium-high heat, which would be around 400 degrees Fahrenheit.
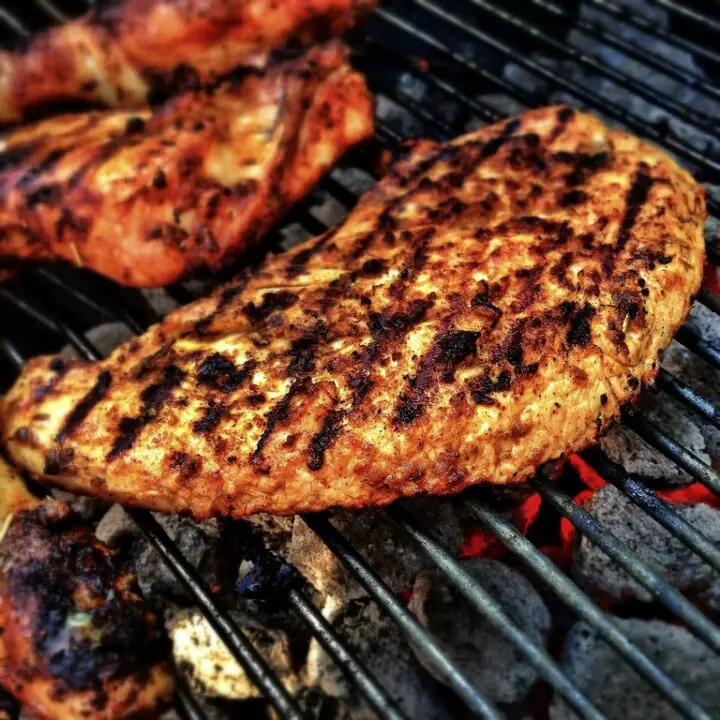
- With the grill at the right temperature, you can proceed to place the chicken breasts on the grill. Make sure they are in a single layer and also spaced out.
- Cook the chicken breasts on the grill for more or less 4 minutes on each side with the lid of the grill open.
- You are to get an instant-read thermometer to test if the chicken breasts are done. It is considered to be done when it reaches 165 degrees Fahrenheit.
- Or, when you slice into one, and all you see all the way through is white, not pink. They will have a browned exterior, which is nice, and also some good sear marks when they are done.
- After that, you can proceed to remove them from the grill. Get a clean serving plate and place them on it.
- Allow the chicken breasts to cool off for about 5 minutes before you proceed to slice them and serve them.
- The resting time is suggested so that the juices from the chicken breasts will not escape from the chicken breasts when you slice them for the first time. So, it is important.
Storage Tips for Gas-Grilled Chicken Breast
Serve
Allow the chicken breast to cool off for more or less 5 minutes before you proceed to slice and serve it.
And, with that being done, the chicken breast can still last up to about an hour outside before you will need to refrigerate it.
Store
The chicken breast can last up to about 3 to 4 days inside a refrigerator, but you will need to keep it covered inside a container.
Freeze
Get a freezer-safe container or Ziploc bag and place the cooled chicken breast inside it. Then, freeze it for about 2 to 3 months.
Frequently Asked Questions about Grilled Chicken Breast on Gas Grill
How Long Do You Grill Chicken Breasts?
The total time to grill chicken breasts is about 10 minutes, which makes the cooking of each side of the chicken breast take about 2 to 3 minutes.
The chicken breast is considered to be done once its internal temperature gets to 160 degrees Fahrenheit.
How Do You Grill Chicken Breast Without Drying It Out?
Well, all you need to do is to marinate the chicken breast for about 1 to 4 hours before you proceed to grill it.
The process of marinating will help the chicken to take in adequate moisture before the process of grilling starts.
So, this answers the above question, “How do you grill chicken breast without drying it out?” as it will help keep the chicken breast from drying out.
How to Grill Chicken Breast On Gas Grill
With this guide, you will learn how to grill chicken breasts on gas grill. You will surely get a soft, juicy, and moist grilled chicken breast with the best sear marks.
Ingredients
- 4 boneless skinless chicken breasts (about 1 and ½ Ibs)
- 4 cups of cold water
- 1 tbsp of Morton’s kosher salt
- 2 tbsp of garlic powder.
- 1 tbsp of dried thyme
- 1 tbsp of vegetable or grape seed oil
Instructions
- Firstly, you need to slice the chicken breast in half width-wise. Then, get a plastic wrap and cover one portion with it.
- This is to stop the chicken juice from getting everywhere in your kitchen when you start to pound it.
- You must pound it until its thickness is uniform. There is also an alternative. You can go for a meat tenderizer with a fat side if you have one.
- But, if you don’t have one, you can use a rolling pin. All you will need to do is to just neat the chicken breast and focus on the thickest part of it, trying to get it to be even with the thinnest area of the chicken breast.
- And, with that being done, you can put the chicken breast aside for a moment. Get a medium-sized bowl and proceed to measure the salt and water into it.
- Then, you are to mix thoroughly till the salt gets dissolved. Afterward, you can add garlic powder and thyme. Then, mix them.
- In the salt mixture, also add the chicken breasts. Ensure that all of the chicken breasts are submerged in the salt mixture.
- When you are sure of this, you can then get a plastic wrap and cover the bowl with it. Proceed to refrigerate it for about 15 minutes to 2 hours.
- After that, you are to get the bowl from the refrigerator, then remove the chicken breast from the bag, and massage it till it gets dry.
- Get rid of the salt mixture. And, allow the chicken breast to rest at room temperature. This should go on for more or less 10 to 15 minutes while you prepare and warm up the grill.
- You are to oil the grill grates. Then, when the grill has cooled off, get a paper towel, and dip it into an oil that has a high smoking point.
- Afterward, you are to get tongs and use them to rub the oiled paper towel onto the grates. With that being said, warm up your grill for direct cooking over medium-high heat, which would be around 400 degrees Fahrenheit.
- With the grill at the right temperature, you can proceed to place the chicken breasts on the grill. Make sure they are in a single layer and also spaced out.
- Cook the chicken breasts on the grill for more or less 4 minutes on each side with the lid of the grill open.
- You are to get an instant-read thermometer to test if the chicken breasts are done. It is considered to be done when it reaches 165 degrees Fahrenheit.
- Or, when you slice into one, and all you see all the way through is white, not pink. They will have a browned exterior, which is nice, and also some good sear marks when they are done.
- After that, you can proceed to remove them from the grill. Get a clean serving plate and place them on it.
- Allow the chicken breasts to cool off for about 5 minutes before you proceed to slice them and serve them.
- The resting time is suggested so that the juices from the chicken breasts will not escape from the chicken breasts when you slice them for the first time. So, it is important.
Nutrition Information:
Yield: 8 Serving Size: 1 gramsAmount Per Serving: Calories: 282Unsaturated Fat: 0g
Final Thoughts on How to Grill Chicken Breast On Gas Grill
I know you might be thinking of ideas for side dishes you might serve alongside chicken. Well, I will give you a few of those before I wrap up this guide.
Some sides you can serve with chicken include Creamy Mashed Potatoes, Keto Mac and Cheese, Gluten-Free Mac and Cheese, Green Bean Casserole with Bacon, Au Gratin Potatoes, Phyllo Cup Appetizers, BLT Coleslaw Salad, Gluten-Free Stuffed Mushrooms, Classic French Onion Soup, and Homemade Potato Wedges.
You can also serve Fresh Mango Salsa, Street Corn Pasta Salad, Strawberry Spinach Salad with Avocado, Chopped Chickpea Greek Salad, Moroccan Chickpea Quinoa Salad, and Grilled Sweet Potato Fries with grilled chicken.
Above are some ideas and suggestions for sides and recipes you can serve with grilled chicken, so this will be the conclusion of this guide on “How to Grill Chicken Breast on Gas Grill.“